
 EN
EN  NL
NL  DE
DE  FR
FR 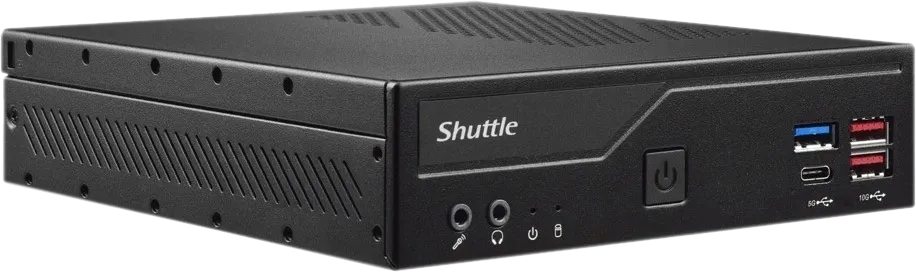
manual
Halonex® Network Tester
TIS-AAA-EU0-10B


Manual
Halonex® Network Tester
TIS-AAA-EU0-10B
Index
About the product
The Halonex® Network Tester is a device that combines multiple functions. One of it’s functions is to provide an Internet connection through a mobile telephone networking technique called LTE. For this to work you will need a mobile (nano sized) SIM-card.
At this moment the following providers are supported:
- KPN mobile
- Vodafone
If you need a different provider, please request it through the support channel and we will do our best to create it for you.
What is in the box?
| Quantity | Item | Product nr |
|---|---|---|
| 1 | Halonex® Network Tester | TIS-AAA-EU0-10B |
| 1 | LevelOne USB Network Adapter 2.5 Gbit/s | |
| 1 | Quick start guide | - |
Warnings & Precautions
Please read the following warnings and precautions carefully.
Compatibility
Halonex® Network Tester is developed to run on Microsoft Windows 11 Home and Pro. All though Windows 10 should also work, it has never been fully tested.
Professionals only
This tool has been made with usability in mind. This said, the application is being used to measure performance on networks. This is a ICT field which is more technical in nature. Thus using this tool requires you to have some ICT knowledge and know the terminology of networking.
Setup NTS - Shuttle server
Need to know
The Halonex® Network Tester is a device that combines multiple functions. One of it's functions is to provide an Internet connection through a mobile telephone networking technique called LTE. For this to work you will need a mobile (nano sized) SIM-card. At this moment the following providers are supported: - KPN mobile - Vodafone If you need a different provider, please request is through the support channel and we will do our best to create it for you.
Installation
Step 1
Place the server
- Take the Halonex® Network Tester out of the box and place it near the switch where the Halonex® devices are connected. Usually this switch is either in the main or a secondary equipment room.
Step 2
Open server casing
- Remove the top of the casing by removing these 2 screws.

Step 3
Insert mobile SIM card
- Insert your Mobile SIM into the SIM slot.

Step 4
Close server casing
- Put the top of the casing back on and fasten the screws again.
Step 5
Step 5a (Optional) – Connect extension cable for LTE antennas
- If mobile network reception is limited on the location you want to test, an extension cable can be purchased separately. This will give you the ability to place the Mobile Antenna up to 10 meters away from the Halonex® Network Tester. If you have such a cable, connect one end to the Halonex® Network Tester and the other end to the Mobile Antenna.
Step 5b – Connect LTE antenna’s
- Connect the Mobile antenna’s to the Halonex® Network Tester.


Step 6
Connect power adapter
- Connect the power adapter to the Halonex® Network Tester

Step 7
Connect to Network
- Connect a CAT cable from the RJ45 port of the Halonex® Network Tester to the UPLINK port of the switch.
Note: Note you MUST connect the cable to the correct port on the Halonex® Network Tester. The correct port is marked in the picture.

Step 8
Start
- Put the power cable into a power wall outlet. Boot up the Halonex® Network Tester by pressing the Power button.
Note: The boot procedure can take up to 5 minutes, please be patient.

Step 9
Shutdown
- Ones you are done with all te tests or you want to move the server to a different location you must shutdown the server properly. To do this simply press the on/off button again (shortly). Wait for about 10 seconds. The server is shutdown if the blue light in the front is off and the fans stop spinning.
Note: ALWAYS shutdown the server by PRESSING the ON/OFF button. If you do NOT follow this procedure you might cause the server NOT to start again.
Setup NTS - Your computer
Initial setup
Step 1
Quick start procedure
Place your test client device
- Take your computer to the Halonex® Network Tester from where you want to test.
Step 2
Connect USB network card
- Connect the LevelOne USB Network Adapter to your computer.

Step 3
Connect client to Halonex® network
- Connect a CAT (6 or higher) cable from the LevelOne USB Network adapter to the Halonex® device.
Step 4
Install (mandatory) Network drivers
- Install the Realtek USB driver by running the application:
Windows 11:
Install_USB_Win11_11015_20_05142024.exe
Windows 10:
Install_USB_Win10_10061_20_05102024.exe
Follow the instructions and accept the agreements and changes made to your computer.
Step 5
Tips
Most likely you will be using a laptop, make sure
A. To charge your laptop! This is important, because Microsoft Windows will scale the down performance of the laptop once you are low on battery. This will result in poor Network Test results.
B. You bring these items:
- The LevelOne USB Network adapter
- A CAT (6 or higher) cable with a length of at the most 1.5 meters.
C. Close all other applications on the computer once performing the Network Tests.
Step 6
Starting the NTS client
Open test client environment
- Start Powershell by opening your Start menu and either type: “powershell” or browse to “Windows Powershell”
Important:
Right click on “Windows Powershell” and select menu option: “Run as Administrator”
Note: Select Powershell WITHOUT ISE.

Step 7
Configure test client environment
Setup your computer by allowing Powershell to run scripts. To do this type this line in the Powershell terminal:
Set-ExecutionPolicy-ExecutionPolicyByPass-scope Process
Confirm your action by answering: A or Y

Step 8
Navigate to the test client location
In the Powershell terminal navigate to the directory / map where the NTS-client is located.
To do this:
Open the file browser and browse to the location where the NTS client is located. Than in the navigation bar Right-Click and select “Copy Address”
In the Powershell terminal type: “cd” and then Right-Click the mouse and hit ENTER.

Step 9
Start test client
Start the NTS-client by typing:
.\fu-nts-client.ps1
Press ENTER to start the application
Step 10
Test client is being setup
The first time the NTS-Client application is started it will ask you to install other necessary software. Confirm that this is allowed by answering A or Y to the questions.
The modules that are installed are:
- PSspeedTest
- ICMP
- PSWakeOnLAN
- Test-PowerPing
- ChocolatelyGet
Step 11
Use the test client
The test client is now ready to use. Choose one of the presented operations.
Tip: Type ? and hit <enter> for a brief help of the operations.

Step 12
Close the test client
To close the test client type: q and hit <enter>
The test client will now close.
Step 13
Collection of the test reports
The test reports can be found in:
[LOCATION OF TEST-CLIENT-APP]\FU-NTS-Reports\
LOCATION OF TEST-CLIENT-APP = Same as in Step 2.
Tip: The location of the report is also shown after you have performed a network performance test (Option T)
Support
More information
For more information, you can check our website www.fiberunlimited.com or the manuals at www.fiberunlimited.com/manuals.
Personal support
If you are in need of personal support please sent your question to support@fiberunlimited.com.
Required information
Please include both the product ID, Mac-address and/or serial number (on the top side of the device) in your inquiry. This will help give you the support you need.
Declaration of conformity
We, FiberUnlimited declare under our sole responsibility that this device is in conformity with the essential requirements and relevant regulations of the applicable EU-directives (2014/30/EU, 2014/35/EU, 2011/65/EU). The complete Declaration of Conformity is available in the download section at www.fiberunlimited.com.
Disposal & Recycle
Guideline 2002/96/CE concerning the handling, collection, recycling and disposal for electrical and electronic equipment and their components („waste electrical and electronic equipment“, known as WEEE). The crossed symbol on a rubbish container indicates that the machine or device is not allowed to be disposed of but it must be handed over to a suitably equipped collection center for proper recycling or disposal.
Disclaimer
Information regarding this product is subject to change without notice.
All information in this publication generally reflects the status at the time of printing. Despite considerable care taken in the preparation of the publication, errors may occur. We also reserve the right to make changes to our products, specifications and other data. Changes may also become necessary as a result of legal, technological or other external requirements, which canno t or can no longer be considered in this publication.
For this reason, we cannot assume any liability which is based solely on the data provided in this publication. The decisive role with regard to the data on products and services is always played by the order placed, the product actually purchased and the documentation in connection with it, or the information provided by our specialist staff in each specific individual case.